
How to Become a DepositPhoto Affiliate: ULTIMATE GUIDE
25 of September 2018We recently became part of the DepositPhoto affiliate program, and we wanted to share with you how to set up your own account and start making money as a DepositPhoto affiliate!
Before you start, we just want to be upfront: If you follow this link to create a DepositPhotos affiliate account, the nice folks at DepositPhotos will give us a small fee for sending you their way. It won’t affect your or your account in any way, and you can also become a referrer once you’ve finished this SOP!
Here’s a step by step guide to create an account and add your first links and banner ads to your website. You can also get the instructional SOP document that you can download and follow that has even more information as well as screenshots to help you complete each step.
You can get the SOP by filling out your email address above and you’ll get your documents shortly!
Table of Contents
WHY IS USING ROYALTY FREE STOCK IMAGES IMPORTANT?
It’s super easy to just do a quick Google search and find an image for your next blog post, but one of the issues with this method is that you’re often restricted by the size of the image. Royalty free images are often available in a high resolution so that, not only will it look high quality, but it can easily be made smaller. Secondly and more importantly, taking images without permission can sometimes result in fines from the original sources, especially if you’ve used an image without linking to the source, or have used an image from a paid source without realising it.

There are royalty-free sites where you can download images for commercial use without backlinking to the source. However, there is much less choice and the quality of the images is far lower than that of Depositphotos.
DEPOSITPHOTOS PRICING AND PLANS
Having access to royalty free stock images can also be extremely cost-effective, especially if you purchase one of the subscriptions. You can end up paying less than 30 cents per image, depending on the subscription you purchase.
There are three ways to purchase royalty free images or videos from Depositphotos. Each has their own advantages, it just depends on your needs and budget.

There are monthly or yearly subscriptions, which allow you to download either 75, 150 or 750 (!) stock images each month, but if you can spring for a yearly subscription you’re only paying for 10 months. If you’re only planning on using stock images now and again, an ‘on demand’ option is available. 10, 25 and 100 images are available with a standard license and last for a year. Make note of your purchase date, as your ‘credits’ will no longer be available.
The new ‘flexible’ plan for $29 per month / $299 per year gives you 30 downloads a month. What’s nice about this plan is that unused credits roll on to the next month, so that they never get wasted. If you use your quota, you can purchase additional images for $1 each.
There are no daily restrictions for any of these plans, so you can use your credits whenever you need them.
WHY BECOME A DEPOSITPHOTO AFFILIATE?
One of the biggest reasons why we, and hopefully you, became a Depositphoto affiliate was because they really do have an awesome database of images, templates and videos that you can use for your website.
Basically, promoting Depositphotos as an affiliate was a no-brainer. Of course, let’s not be coy, the commision for Depositphotos is also very generous.
A new Depositphoto customer will get you a smooth 30% commision, whilst an existing one will get your 15%. Since the lowest subscription is $69 per month, you’ll still receive a more than reasonable payout of approximately $20. There’s also a 30-day tracking cookie, which means if someone clicks through one of your affiliate banners or text ads from your site and purchases something within those 30 days, you’ll receive the commision for that sale.
Once you’ve become a Depositphoto affiliate, you’ll have access to plenty of banner images and text ‘creatives’ to use on your site to encourage your visitors to take advantage of Depositphotos offers. Depositphotos have creatives in several languages, including Chinese, German, English, Spanish, Russian, French, Italian and Turkish, but you can actually request images to be made in your language if they don’t already exist.
They come in a variety of sizes that are perfect to be used in the sidebar on your blog, as a banner ad on your homepage or a larger image to attract visitors on your resources page.
Sizes Include:
- 300×250
- 160×600
- 798×90
- 468×60
- 336×280
- 120×600
- 250×250
- 125×125
DEPOSITPHOTO AFFILIATE SUMMARY
- 30% commission for new customers
- 15% commision for existing customers
- 30-day cookie
- Various image and text creatives in several different languages
- View reports of impressions, conversions etc
CREATING AN AFFILIATE ACCOUNT
Creating a Depositphoto affiliate account is pretty simple. If you already have a Depositphoto account for stock images, you can use the same login details for your affiliate account.
Go to the Depositphoto Affiliate signup page and if you already have an account, use your existing Depositphoto login to create an affiliate account. Otherwise, click on the blue AFFILIATE SIGNUP button.

On the account creation page, fill in your account details. You’ll need to add the following information:
Company name – the name of your company, .e.g SOP Templates
Address/zip code – associated with your company
Country – the country where your company is located
Phone number – a contact number for your company
Once you’ve completed your account details, move down and fill in your personal details:
Email address – an email address you use for your company or a personal email
Password – create a password between 6 and 16 characters. I personally recommend using LastPass to automatically generate and safely store all your passwords.
First name – your given name or a name that you want to be associated with your account
Last name – your surname or a name that you want to be associated with your account
Title – this is optional, but you can add your prefix here (Mr / Ms / etc)
Read and then tick the TERMS AND CONDITIONS policy, as well as ticking the box for consent.
Once your account has been created, you can easily change any of these details in the ACCOUNT DETAILS section of the dashboard.
SETTING UP YOUR BILLING PREFERENCES
From the top left-hand side menu click MY ACCOUNT and then BILLING from the drop-down menu.
There are several ways that you can be paid for your Depositphoto affiliate commision: Bank Transfer, Direct Deposit, Other, Wire and Paypal. To set up your payment method, click the pencil icon next to BILLING DETAILS. Once you select your payment method, the block will refresh and allow you to fill in the relevant details.
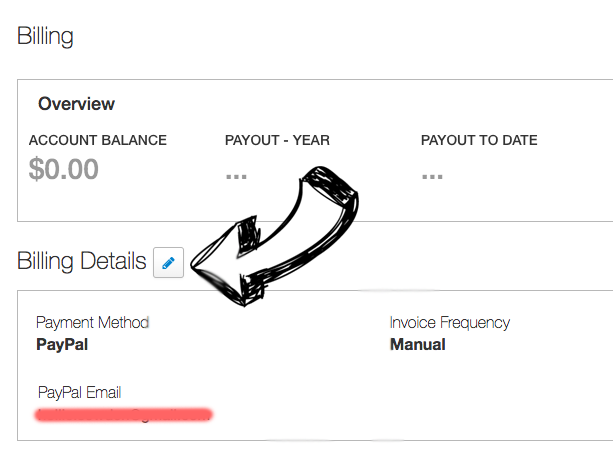 Paypal is probably the easiest option, as you simply add your Paypal email address and click APPLY.
You’ll only be paid once you have made $50 of commissions. In the OVERVIEW section at the top of the BILLING dashboard, you can see how much money you currently have in your account under ACCOUNT BALANCE. You can also view your payouts for the current year, and payouts to date.
NAVIGATING THE DEPOSITPHOTO AFFILIATE DASHBOARD
When you first arrive on the Depositphoto Affiliate Dashboard you’ll see a brief overview of your affiliate activity from the last 7 days. To see more advanced reports, click on REPORTS on the left-hand side menu and then choose one of the reports to view.
PERFORMANCE reports show you a detailed view of the impressions, conversions and payouts from your affiliate links and banners. The report is in real time, but you can change the date and other report information to track information from an earlier date or longer time frame. You can also download your reports for your own records.
ADDING YOUR FIRST LINK
From the AFFILIATE DASHBOARD, under FEATURED OFFERS, click on the DEPOSITPHOTO AFFILIATE PROGRAM. The URL under YOUR TRACKING LINK is the basic link that you can use in a blog post or other location on your website. This will go to a DEFAULT landing page that you can view by clicking the PREVIEW LANDING PAGE button. Using the preview means you don’t have to ‘test’ the URLs and affect your performance reports.
You can change your landing page to another language on the list, these include Chinese, German, English, Spanish, Russian, French, Italian and Turkish.
If you wish to make your tracking link more discreet, you can create a TinyURL that will automatically shorten your link, removing your ID, and other code.
![]()
Once you have customized your link, highlight YOUR TRACKING LINK and copy.
You can add this as a text link within a blog post by highlighting the text in your blog post, clicking the ADD LINK option and pasting in the link. If a user clicks on this link, it will take them to your chosen landing page.
ADDING A ‘CREATIVE’ BANNER OR TEXT
The Depositphoto Affiliate Program provides you with visually appealing banners and text ‘creatives’ to encourage visitors on your site to click through and hopefully sign up for a Depositphotos account.
To view and add a ‘creative’, scroll down the Depositphoto Affiliate Program page until you reach CREATIVES. On the left-hand side is the type of ‘creative’: STATIC BANNER, TEXT CREATIVE or HTML EMAIL.

A STATIC BANNER is an image promoting the advantages of using Depositphotos.
A TEXT CREATIVE is Depositphoto-created copy with your affiliate ID embedded into it that you can copy and paste as a link into a blog post.
An HTML EMAIL embeds a ‘signup’ form for users to signup to receive emails from Depositphotos.

To view all the ‘creatives’, expand your view by clicking on the drop-down menu on the right-hand side and selecting 200. All the creatives are mixed together, including the different languages, but you can see which language the creative is by checking the middle column, NAME/PREVIEW.
Each language is represented by a shortened version of 2 letters:
EN – ENGLISH
ES – SPANISH
IT – ITALIAN
CN – CHINESE (SIMPLIFIED MANDARIN)
RU – RUSSIAN
TR – TURKISH
FR – FRENCH
DE – GERMAN
You can also see the size of the banner ad, a mini description or the text that will appear in the text ‘creatives’. If you’re looking for a particular language, simply use the FIND shortcut on your keyboard (OSX – COMMAND + F, WINDOWS – Ctrl / Command + F) and search for your language.

To preview the STATIC BANNER or HTML EMAIL, click on the blue link in the NAME/PREVIEW COLUMN.
From the pop-up, you can also copy the code that you will need to embed your banner into your blog post or website. Alternatively, you can your embed code by clicking the GET CODE on the right-hand side of the CREATIVE space. Once you have copied the code, paste it into a space on your site. If you’re using WordPress, make sure you’re in TEXT mode and not VISUAL. For example, the smaller 300×250 banners are perfect for a sidebar, whereas the longer 728×90 banners look good embedded in a blog post or resources page on your website.

USING DEPOSITPHOTO’S IMAGE WIDGET
The image widget is an interactive widget that you can customize to fit the aesthetics of your site. Once you’ve added the widget to a post or page, visitors can search for an image within the widget. To select an image they’ve found, the visitor will click through (using your affiliate link) to their chosen image. On clicking the DOWNLOAD button they will be prompted to purchase a package of images or Depositphoto subscription plan. To customize your widget, go to TOOLS and then IMAGE WIDGET in the left-hand side menu.
In the ‘CREATE YOUR WIDGET’ section customize the following sections:
Feed type – category (you can select the image category in the drop-down menu below), portfolio (link to a photographer’s portfolio in Depositphotos), search (enter your own search query) or favourites (pulled from your own personal account)
Depending on the ‘feed type’ you choose, the option below will differ. If you select ‘category’, the drop-down menu below will show the following:
Category – select a category of images you want your site visitors to see.If you select ‘portfolio’, you will see a space titled
Author ID / Login – add the ID of the photo whose photographs you want to share.
Search brings up the Search query option that allows you to add your own customized search word. The widget will show those images related to your search query. Selecting the ‘favourites’ tab will introduce a drop-down menu to select a ‘favourite’ list from your personal account.
Theme – This is the colour of the widget that will appear in your post. Select from light, dark, white or transparent
Background – changes the colour of the widget background. Choose light, dark or transparent.
Type – select the types of media you want to promote in your widget. You can select one or all of the list (photo, vector image and video).
Editorial use – if you tick the box for ‘editorial use only’ your widget will only display images that can be used in a magazine, blog or website but can’t be used for commercial purposes.
Sort by – This will sort how the files will show, for example, random, newest or popular.
Thumbnail size – This will adjust the size of each individual image shown in the widget
Feed size – Change the size of the widget size, depending on the size of the space you want to add the widget to.
Search bar – removes or places the search bar in the widget
Show logo – removes or place the Depositphoto logo on the widget
Thumb. Preview – if ‘yes’ shows an expanded view of the thumbnail when rolled over
Hide pager – removes or shows the number of images for the chosen category
Show border – removes or places a border around the widget
Responsive mode – the size of the widget will respond to changes in browser size.
Additional – ticking the box will add ‘nofollow’ to a link
Return to the top of the widget and select the widget format, either iframe, block or PHP.
Once you’ve selected the format, scroll down to the bottom of the widget and select the code.

Since you need to choose the size of the widget beforehand, you’ve probably already decided where on your website it will appear. Go to the backend of your website and navigate to the page, post or sidebar where you will add the widget. Paste in the code and save. The widget should show automatically on your site. You can easily make adjustments to the widget within the dashboard if you’re not happy with the size, images etc.
MORE THINGS YOU CAN DO WITH AS A DEPOSITPHOTO AFFILIATE
Although we’ve made some recommendations on where you might want to add your affiliate links on your site, there are plenty of other ways to subtly promote Depositphotos. Placing ads all over your site will turn off your audience and look spammy, so consider the placement of your ads in order to get a larger chance of a click through.
You can consider the following methods for promoting DepositPhotos:
- A mega blog post
- Include it in a list of valuable products
- Add it to your resources page
- Review the product
- Compare it with our similar products
- Recommend the product in an email newsletter
- Create a course that includes them
ANY QUESTIONS?
If you’ve followed our SOP document and still have questions about setting up your DepositPhoto affiliate account, send us a message at support@soptemplates.com.
If you haven’t already, you can still go and download your free step-by-step guide to set up your DepositPhoto affiliate account. You can also pass on the instructions to a freelancer or team member.
Happy delegating!